Friday 14 December 2012

Jabberwocky - Finishing the Sets


First set up of the trenches set...


First set up of the No Mans Land set...


A couple of bits to add to the No Mans Land set...

 I made a couple of small raised walking platforms out of bulsar wood and glued together with hot glue, then sprayed white. 


The Silhouettes

We decided that for some parts of the poem, where we were going to show birds and rats feeding on corpses and a horse struggling out of a mud filled crater, that we would do these in silhouettes and to make them animatable we have made them on a sheet of acetate with black plasticine. when it come to animating them they will be back lit on a light box with tissue paper under the acetate to filter the light a little. I made the bird.


Rob made the rats...

We are also going to do the plane and air ship in silhouettes but as they don't need moving parts, we are going to cut them out of paper. here are a few designs i did for the airship.


RIBS


We wanted some metal looking ruins that would look a bit like a rib cage coming up through the ground.
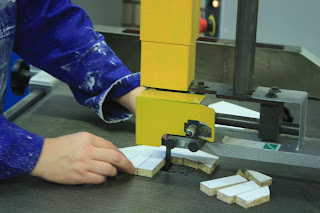
We stared by cutting three curved pieces of wood, of slightly different sizes. We roughly cut out the shapes.

We sanded down the inside of the curves on a circular sander.
And the outside of the curves...
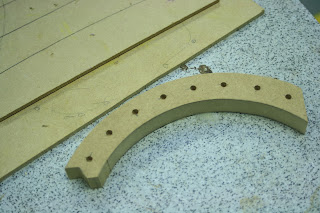
Then we drilled small guide holes about half way through the two outer pieces of wood.
We then drill larger holes over the little ones...
Glued all three together using super glue...
And sprayed it white.

The original plan was to make a cast of this Rib in Gelflex, and then mass produce more in resin. However there were problems making the mould, so instead myself and Rob made another four in the same way as the first one, out of wood...


Set Details - No Mans Land

For the No Mans Land set, everyone made a crater out of plasticine on a wooden board, these were to be vacuum formed, holes were then drilled around the inside and outside edges which allows the air to be sucked out around the crater. Once these were vacuum formed in plastic we were left with a replica of the original sculpt. These were then cut out from the plastic sheets and covered in white texture paint.


Myself and Rob started making the two big trees that would be in the for ground of the set, we started with two wooden basses, each with a hole drilled in the centre, we glued some thick wire into these holes. We then padded out the bottoms of the trunks with tin foil, this was then covered in plasticine, branches were added on and the trees built up. 


We then painted the trees with PVA glue to seal them and then sprayed them white.


The group designed tree silhouettes on paper, which Kane put into illustrator and cut out on the laser cutter, we also did ruined buildings in the same way. 


I then cut out lots of small triangles which rob glues to the back of each tree, stump and ruin. These allowed the 2D cut outs to stand up. We also made all these cut outs in various sizes to create a false perspective, the smaller one going at the back and getting larger the further forward they come. 


Set Details - Trenches


To decorate the trench sets we all made cables out of super sculpy and which were backed and given a  bass coat of paint before being dry brushed with lighter colours to highlight them, these will be lying around in the trenches.


We also made planks for the floor of the trenches which were MDF carved into with scalpels to create wood grain and depth, these were then painted with textured paint, given a bass colour of brown and then dry brushed with lighter and darker browns. 


Thursday 13 December 2012

MODROC


We used Moc roc to cover the chicken wire and make it strong...

These were all covered in white textured paint. 
 The sides of the trenches were covered with straws which were also covered with textured paint.

 The trenches where painted a base brown colour, and we dry brushed them with lighter and darker browns to add depth.

Making the Trenches


We started making the full size sets for the trenches by cutting cardboard into arches getting consecutively larger, this will make a false perspective to the set, smaller at the back than the front, making it look further away.


We did the same for the hill that will be at the back of the no mans land set. 


Then we covered the cardboard in chicken wire and tied it down with garden wire which we pushed through the cardboard.

The Jabberwocky - Set Building


This semester, as a class, we will be building sets for an animated interpretation of The Jabberwocky by Lewis Carrol. The Jabberwocky will be turned into a World War 1 scene, there will be two scenes, one in a trench with and old injured soldier and a younger soldier, the old soldier narrates some of the poem, the other scene is of a white no mans land, of burnt out forest and destroyed buildings.

 The first thing we did was make scale models of the two main sets out of cardboard. this is the trench set: